Pages

Thursday, December 29, 2011

Enable Sqlserver access over the network

abling SQL Server 2008 (R2) access over Network
Posted on June 21, 2010

First: enable SQL Server itself to be accessed over the network
Open SQL Server Configuration Manager
Expand SQL Server Network Configuration and click Protocols for MSSQLSERVER

Doubleclick TCP/IP

Set Enabled to Yes


(click for large size)

Secondly: change the Windows Firewall to allow incoming connections on the TCP port of SQL Server
Open Windows Firewall with Advanced Security
Click on New Rule


(click for large size)

Now in the wizard you set the type of the rule to Port.


Hit Next.

On the second window you set the Specific local ports to 1433:


Hit Next.

Allow the connection.


Hit Next.

Now enable the checkboxes you want to. I set mine only to Private. Because I only need to access the SQL on my laptop at home:


Hit Next.


Hit Finish and you’re ready to develop SQL over network

How to: Enable Network Access in SQL Server Configuration Manager

To enable a network protocol


On the Start menu, choose All Programs, point to Microsoft SQL Server and then click SQL Server Configuration Manager.

Optionally, you can open Computer Manager by right-clicking My Computer and choosing Manage. In Computer Management, expand Services and Applications, expand SQL Server Configuration Manager.


Expand SQL Server Network Configuration, and then click Protocols for InstanceName.


In the list of protocols, right-click the protocol you want to enable, and then click Enable.

The icon for the protocol will change to show that the protocol is enabled.


To disable the protocol, follow the same steps, but choose Disable in step 3.
To configure a network protocol


On the Start menu, right-click My Computer, and then choose Manage.


In Computer Management, expand Services and Applications, expand SQL Server Configuration Manager, expand Server Network Configuration, expand Protocols for InstanceName, and then click the protocol you want to configure.

Access sql server 2008 over network

re trying to connect to SQL Server 2008 Express remotely without enable remote connection first, you may see these error messages:
“Cannot connect to SQL-Server-Instance-Name
An error has occurred while establishing a connection to the server. When connecting to SQL Server 2005, this failure may be caused by the fact that under the default settings SQL Server does not allow remote connections. (provider: SQL Network Interfaces, error: 28 – Server doesn’t support requested protocol) (Microsoft SQL Server)”

“Cannot connect to SQL-Server-Instance-Name
An error has occurred while establishing a connection to the server. When connecting to SQL Server 2005, this failure may be caused by the fact that under the default settings SQL Server does not allow remote connections. (provider: SQL Network Interfaces, error: 26 – Error Locating Server/Instance Specified) (Microsoft SQL Server)”

“Cannot connect to SQL-Server-Instance-Name
Login failed for user ‘username‘. (Microsoft SQL Server, Error: 18456)”


To enable remote connection on SQL Server 2008 Express, see the step below:
Start SQL Server Browser service if it’s not started yet. SQL Server Browser listens for incoming requests for Microsoft SQL Server resources and provides information about SQL Server instances installed on the computer.
Enable TCP/IP protocol for SQL Server 2008 Express to accept remote connection.
(Optional) Change Server Authentication to SQL Server and Windows Authentication. By default, SQL Server 2008 Express allows only Windows Authentication mode so you can connect to the SQL Server with current user log-on credential. If you want to specify user for connect to the SQL Server, you have to change Server Authentication to SQL Server and Windows Authentication.

Note: In SQL Server 2008 Express, there isn’t SQL Server Surface Area Configuration so you have to configure from SQL Server Configuration Manager instead.
Step-by-step
Open SQL Server Configuration Manager. Click Start -> Programs -> Microsoft SQL Server 2008 -> Configuration Tools -> SQL Server Configuration Manager.

On SQL Server Configuration Manager, select SQL Server Services on the left window. If the state on SQL Server Browser is not running, you have to configure and start the service. Otherwise, you can skip to step 6.

Double-click on SQL Server Browser, the Properties window will show up. Set the account for start SQL Server Browser Service. In this example, I set to Local Service account.

On SQL Server Browser Properties, move to Service tab and change Start Mode to Automatic. Therefore, the service will be start automatically when the computer starts. Click OK to apply changes.

Back to SQL Server Configuration Manager, right-click on SQL Server Bowser on the right window and select Start to start the service.

On the left window, expand SQL Server Network Configuration -> Protocols for SQLEXPRESS. You see that TCP/IP protocol status is disabled.

Right-click on TCP/IP and select Enable to enable the protocol.

There is a pop-up shown up that you have to restart the SQL Service to apply changes.

On the left window, select SQL Server Services. Select SQL Server (SQLEXPRESS) on the right window -> click Restart. The SQL Server service will be restarted.

Open Microsoft SQL Server Management Studio and connect to the SQL Server 2008 Express.

Right-click on the SQL Server Instance and select Properties.

On Server Properties, select Security on the left window. Then, select SQL Server and Windows Authentication mode.

Again, there is a pop-up shown up that you have to restart the SQL Service to apply changes.

Right-click on the SQL Server Instance and select Restart.

That’s it. Now you should be able to connect to the SQL Server 2008 Express remotely.

Wednesday, December 28, 2011

Java script code for login on enter key press

function clickButton(e, buttonid){

      var evt = e ? e : window.event;

      var bt = document.getElementById(buttonid);

      if (bt){

          if (evt.keyCode == 13){

                bt.click();

                return false;

          }

      }

}

Disable right click in all browsers


function md(e)
{
  try { if (event.button==2||event.button==3) return false; } 
  catch (e) { if (e.which == 3) return false; }
}
document.oncontextmenu = function() { return false; }
document.ondragstart   = function() { return false; }
document.onmousedown   = md;

Sunday, December 18, 2011

How Google crawler works???


Google runs on a distributed network of thousands of low-cost computers and can therefore carry out fast parallel processing. Parallel processing is a method of computation in which many calculations can be performed simultaneously, significantly speeding up data processing. Google has three distinct parts:
  • Googlebot, a web crawler that finds and fetches web pages.
  • The indexer that sorts every word on every page and stores the resulting index of words in a huge database.
  • The query processor, which compares your search query to the index and recommends the documents that it considers most relevant.
Let’s take a closer look at each part.

. Googlebot, Google’s Web Crawler

Googlebot is Google’s web crawling robot, which finds and retrieves pages on the web and hands them off to the Google indexer. It’s easy to imagine Googlebot as a little spider scurrying across the strands of cyberspace, but in reality Googlebot doesn’t traverse the web at all. It functions much like your web browser, by sending a request to a web server for a web page, downloading the entire page, then handing it off to Google’s indexer.
Googlebot consists of many computers requesting and fetching pages much more quickly than you can with your web browser. In fact, Googlebot can request thousands of different pages simultaneously. To avoid overwhelming web servers, or crowding out requests from human users, Googlebot deliberately makes requests of each individual web server more slowly than it’s capable of doing.
Googlebot finds pages in two ways: through an add URL form, www.google.com/addurl.html, and through finding links by crawling the web.


Unfortunately, spammers figured out how to create automated bots that bombarded the add URL form with millions of URLs pointing to commercial propaganda. Google rejects those URLs submitted through its Add URL form that it suspects are trying to deceive users by employing tactics such as including hidden text or links on a page, stuffing a page with irrelevant words, cloaking (aka bait and switch), using sneaky redirects, creating doorways, domains, or sub-domains with substantially similar content, sending automated queries to Google, and linking to bad neighbors. So now the Add URL form also has a test: it displays some squiggly letters designed to fool automated “letter-guessers”; it asks you to enter the letters you see — something like an eye-chart test to stop spambots.
When Googlebot fetches a page, it culls all the links appearing on the page and adds them to a queue for subsequent crawling. Googlebot tends to encounter little spam because most web authors link only to what they believe are high-quality pages. By harvesting links from every page it encounters, Googlebot can quickly build a list of links that can cover broad reaches of the web. This technique, known as deep crawling, also allows Googlebot to probe deep within individual sites. Because of their massive scale, deep crawls can reach almost every page in the web. Because the web is vast, this can take some time, so some pages may be crawled only once a month.
Although its function is simple, Googlebot must be programmed to handle several challenges. First, since Googlebot sends out simultaneous requests for thousands of pages, the queue of “visit soon” URLs must be constantly examined and compared with URLs already in Google’s index. Duplicates in the queue must be eliminated to prevent Googlebot from fetching the same page again. Googlebot must determine how often to revisit a page. On the one hand, it’s a waste of resources to re-index an unchanged page. On the other hand, Google wants to re-index changed pages to deliver up-to-date results.
To keep the index current, Google continuously recrawls popular frequently changing web pages at a rate roughly proportional to how often the pages change. Such crawls keep an index current and are known as fresh crawls. Newspaper pages are downloaded daily, pages with stock quotes are downloaded much more frequently. Of course, fresh crawls return fewer pages than the deep crawl. The combination of the two types of crawls allows Google to both make efficient use of its resources and keep its index reasonably current.

2. Google’s Indexer

Googlebot gives the indexer the full text of the pages it finds. These pages are stored in Google’s index database. This index is sorted alphabetically by search term, with each index entry storing a list of documents in which the term appears and the location within the text where it occurs. This data structure allows rapid access to documents that contain user query terms.
To improve search performance, Google ignores (doesn’t index) common words called stop words (such as theisonorofhowwhy, as well as certain single digits and single letters). Stop words are so common that they do little to narrow a search, and therefore they can safely be discarded. The indexer also ignores some punctuation and multiple spaces, as well as converting all letters to lowercase, to improve Google’s performance.

3. Google’s Query Processor

The query processor has several parts, including the user interface (search box), the “engine” that evaluates queries and matches them to relevant documents, and the results formatter.
PageRank is Google’s system for ranking web pages. A page with a higher PageRank is deemed more important and is more likely to be listed above a page with a lower PageRank.
Google considers over a hundred factors in computing a PageRank and determining which documents are most relevant to a query, including the popularity of the page, the position and size of the search terms within the page, and the proximity of the search terms to one another on the page. A patent application discusses other factors that Google considers when ranking a page. Visit SEOmoz.org’s report for an interpretation of the concepts and the practical applications contained in Google’s patent application.
Google also applies machine-learning techniques to improve its performance automatically by learning relationships and associations within the stored data. For example, the spelling-correcting system uses such techniques to figure out likely alternative spellings. Google closely guards the formulas it uses to calculate relevance; they’re tweaked to improve quality and performance, and to outwit the latest devious techniques used by spammers.
Indexing the full text of the web allows Google to go beyond simply matching single search terms. Google gives more priority to pages that have search terms near each other and in the same order as the query. Google can also match multi-word phrases and sentences. Since Google indexes HTML code in addition to the text on the page, users can restrict searches on the basis of where query words appear, e.g., in the title, in the URL, in the body, and in links to the page, options offered by Google’s Advanced Search Form and Using Search Operators (Advanced Operators).
Let’s see how Google processes a query.
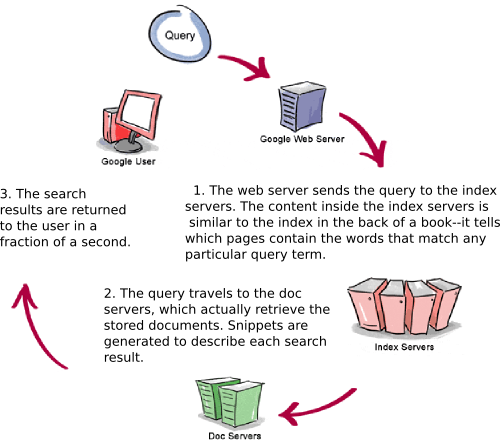
1. The web server sends the query to the index        servers. The content inside the index servers is similar        to the index in the back of a book--it tells which pages        contain the words that match any particular query       term.          2. The query travels to the doc servers, which   actually retrieve the stored documents. Snippets are    generated to describe each search result.       3. The search results are returned to the user          in a fraction of a second.


Wednesday, December 14, 2011

10 way to improve your website performance


Why focus on front-end performance?

The front-end (i.e. your HTML, CSS, JavaScript, and images) is the most accessiblepart of your website. If you’re on a shared web hosting plan, you might not have root (or root-like) access to the server and therefore can’t tweak and adjust server settings. And even if you do have the right permissions, web server and database engineering require specialized knowledge to give you any immediate benefits.
It’s also cheap. Most of the front-end optimization discussed can be done at no other cost but your time. Not only is it inexpensive, but it’s the best use of your time because front-end performance is responsible for a very large part of a website’s response time.
With this in mind, here are a few simple ways to improve the speed of your website.

1. Profile your web pages to find the culprits.

Firebug screen shot.
It’s helpful to profile your web page to find components that you don’t need or components that can be optimized. Profiling a web page usually involves a tool such asFirebug to determine what components (i.e. images, CSS files, HTML documents, and JavaScript files) are being requested by the user, how long the component takes to load, and how big it is. A general rule of thumb is that you should keep your page components as small as possible (under 25KB is a good target).
Firebug’s Net tab (shown above) can help you hunt down huge files that bog down your website. In the above example, you can see that it gives you a break down of all the components required to render a web page including: what it is, where it is, how big it is, and how long it took to load.
There are many tools on the web to help you profile your web page – check out this guide for a few more tools that you can use.

2. Save images in the right format to reduce their file size.

JPEG vs GIF screenshot.
If you have a lot of images, it’s essential to learn about the optimal format for each image. There are three common web image file formats: JPEGGIF, and PNG. In general, you should use JPEG for realistic photos with smooth gradients and color tones. You should use GIF or PNG for images that have solid colors (such as charts and logos).
GIF and PNG are similar, but PNG typically produces a lower file size. Read Coding Horror’s weigh-in on using PNG’s over GIF’s.

3. Minify your CSS and JavaScript documents to save a few bytes.

Minification is the process of removing unneeded characters (such as tabs, spaces, source code comments) from the source code to reduce its file size. For example:
This chuck of CSS:
.some-class {
  color: #ffffff;
  line-height: 20px;
  font-size: 9px;
}
can be converted to:
.some-class{color:#fff;line-height:20px;font-size:9px;}
…and it’ll work just fine.
And don’t worry – you won’t have to reformat your code manually. There’s a plethora of free tools available at your disposal for minifying your CSS and JavaScript files. For CSS, you can find a bunch of easy-to-use tools from this CSS optimization tools list. For JavaScript, some popular minification options are JSMINYUI Compressor, andJavaScript Code Improver. A good minifying application gives you the ability to reverse the minification for when you’re in development. Alternatively, you can use an in-browser tool like Firebug to see the formatted version of your code.

4. Combine CSS and JavaScript files to reduce HTTP requests

For every component that’s needed to render a web page, an HTTP request is created to the server. So, if you have five CSS files for a web page, you would need at least five separate HTTP GET requests for that particular web page. By combining files, you reduce the HTTP request overhead required to generate a web page.
Check out Niels Leenheer’s article on how you can combine CSS and JS files using PHP(which can be adapted to other languages). SitePoint discusses a similar method ofbundling your CSS and JavaScript;they were able to shave off 1.6 seconds in response time, thereby reducing the response time by 76% of the original time.
Otherwise, you can combine your CSS and JavaScript files using good, old copy-and-paste‘ing (works like a charm).

5. Use CSS sprites to reduce HTTP requests

CSS Sprites on Digg.
CSS Sprite is a combination of smaller images into one big image. To display the correct image, you adjust the background-position CSS attribute. Combining multiple images in this way reduces HTTP requests.
For example, on Digg (shown above), you can see individual icons for user interaction. To reduce server requests, Digg combined several icons in one big image and then used CSS to position them appropriately.
You can do this manually, but there’s a web-based tool called CSS Sprite Generatorthat gives you the option of uploading images to be combined into one CSS sprite, and then outputs the CSS code (the background-position attributes) to render the images.

6. Use server-side compression to reduce file sizes

This can be tricky if you’re on a shared web host that doesn’t already server-side compression, but to fully optimize the serving of page components they should be compressed. Compressing page objects is similar to zipping up a large file that you send through email: You (web server) zip up a large family picture (the page component) and email it to your friend (the browser) – they in turn unpack your ZIP file to see the picture. Popular compression methods are Deflate and gzip.
If you run your own dedicated server or if you have a VPS – you’re in luck – if you don’t have compression enabled, installing an application to handle compression is a cinch. Check out this guide on how to install mod_gzip on Apache.

7. Avoid inline CSS and JavaScript

By default, external CSS and JavaScript files are cached by the user’s browser. When a user navigates away from the landing page, they will already have your stylesheets and JavaScript files, which in turn saves them the need to download styles and scripts again. If you use a lot of CSS and JavaScript in your HTML document, you won’t be taking advantage of the web browser’s caching features.

8. Offload site assets and features

Amazon S3Fox for Six Revisions.
Unloading some of your site assets and features to third-party web services greatly reduces the work of your web server. The principle of offloading site assets and features is that you share the burden of serving page components with another server.
You can use Feedburner to handle your RSS feeds, Flickr to serve your images (be aware of the implications of offloading your images though), and the Google AJAX Libraries API to serve popular JavaScript frameworks/libraries like MooTools, jQuery, and Dojo.
For example, on Six Revisions I use Amazon’s Simple Storage Service (Amazon S3 for short), to handle the images you see on this page, as well as Feedburner to handle RSS feeds. This allows my own server to handle just the serving of HTML, CSS, and CSS image backgrounds. Not only are these solutions cost-effective, but they drastically reduce the response times of web pages.

9. Use Cuzillion to plan out an optimal web page structure

Cuzzillion screen shot.
Cuzillion is a web-based application created by Steve Souders (front-end engineer for Google after leaving Yahoo! as Chief of Performance) that helps you experiment with different configurations of a web page’s structure in order to see what the optimal structure is. If you already have a web page design, you can use Cuzillion to simulate your web page’s structure and then tweak it to see if you can improve performance by moving things around.
View InsideRIA’s video interview of Steve Sounders discussing how Cuzillion works and the Help guide to get you started quickly.

10. Monitor web server performance and create benchmarks regularly.

The web server is the brains of the operation – it’s responsible for getting/sending HTTP requests/responses to the right people and serves all of your web page components. If your web server isn’t performing well, you won’t get the maximum benefit of your optimization efforts.
It’s essential that you are constantly checking your web server for performance issues. If you have root-like access and can install stuff on the server, check out ab – an Apache web server benchmarking tool or Httperf from IBM.
If you don’t have access to your web server (or have no clue what I’m talking about) you’ll want to use a remote tool like Fiddler or HTTPWatch to analyze and monitor HTTP traffic. They will both point out places that are troublesome for you to take a look at.
Benchmarking before and after making major changes will also give you some insight on the effects of your changes. If your web server can’t handle the traffic your website generates, it’s time for an upgrade or server migration.

Friday, December 9, 2011

Paging in List View Control

ASPX Code For DataList

<asp:DataList ID="DataListPainting" runat="server" BorderColor="black" CellPadding="3"
Font-Size="5px" Font-Names="Tahoma"
HeaderStyle-BackColor="#000000" RepeatColumns="5"
RepeatDirection="Horizontal" Width="730px">
<HeaderStyle Font-Size="16px" HorizontalAlign="Left" Height="15" ForeColor="White" />
<HeaderTemplate>
<p>
<font color="#484848" face="Impact">&nbsp;&nbsp;&nbsp;&nbsp;Painting Gallary </font></p>
<p>
&nbsp;</p>
</HeaderTemplate>
<HeaderStyle BackColor="#f0f0f0" Font-Names="Tahoma"></HeaderStyle>
<ItemStyle Width="243px" />
<ItemTemplate>
<table width="100%" style="margin-left: 0px; height: 200px">
<tr>
<td align="left" style="height: 100px; vertical-align: top">
<a href='<%# Eval("ImageUrl","Paintings/{0}")%>' rel="prettyPhoto[pp_gal]"
title='<%# Eval("ImageUrl") %>'>
<img src='<%# Eval("ImageUrl","Paintings/{0}")%>' width="120" height="100"
style="text-decoration: none; border-color: Gray; border-width: 1px; border-style: solid;"
alt="" />
</a>
</td>
</tr>
<tr>
<td align="left" style="font-family: Arial; font-size: 12px; font-weight: normal;
vertical-align: top; color: #484848; text-align: left;">
<%#Eval("PaintingName")%>

</td>
</tr>
<tr>
<td align="left" style="font-family: Arial; font-size: 11px; font-weight: normal;
vertical-align: top; color: #484848; text-align: left;">
Size: <%#Eval("PaintingWidth")%> * <%#Eval("PaintingHeight")%>

</td>
</tr>
<tr>
<td align="left" style="font-family: Arial; font-size: 11px; font-weight: normal;
vertical-align: top; color: #484848; text-align: left;">
Price: <%#Eval("PaintingPrice")%>
<div style="height: 10px">
</div>
</td>
</tr>
<tr>
<td align="left" style="font-family: Arial; font-size: 11px; font-weight: normal;
vertical-align: top; color: #484848; text-align: left;">
<asp:ImageButton ID="imgBtnBuy" runat="server" PostBackUrl='<%# "BuyPainting.aspx?Id="+Eval("ID")+"&Name="+Eval("PaintingName")+"&Price="+Eval("PaintingPrice")+"&Width="+Eval("PaintingWidth")+"&Height="+Eval("PaintingHeight")+"&Image="+ Eval("ImageUrl","Paintings/{0}") %>' />

</td>
</tr>

</table>
</ItemTemplate>
<AlternatingItemStyle Width="243px" />

</asp:DataList>


Aspx Paging Control Code


<asp:DataPager ID="DataPagerPainting" runat="server" PagedControlID="DataListPainting"
PageSize="5" OnPreRender="DataPagerPainting_PreRender">
<Fields>
<asp:NextPreviousPagerField ShowFirstPageButton="True" ShowNextPageButton="False" />
<asp:NumericPagerField />
<asp:NextPreviousPagerField ShowLastPageButton="True" ShowPreviousPageButton="False" />
</Fields>
</asp:DataPager>


C# Code for Paging


protected void DataPagerPainting_PreRender(object sender, EventArgs e)
{

OleDbConnection con = new OleDbConnection(Connstring);
//Binding Building Data
DataSet ds = new DataSet();
string queryInsert = " Select * from tblPaintingDetails where IsSoldOut=0 order by ID";
OleDbCommand cmd = new OleDbCommand(queryInsert, con);


OleDbDataAdapter adp = new OleDbDataAdapter(cmd);
DataSet data = new DataSet();
adp.Fill(data);


DataListPainting.DataSource = data;
DataListPainting.DataBind();

con.Close();

}


How To Deploy ASP.NET web Application

XCOPY Deployment

The most trivial technique is to simply copy your web application files to the production server hard drive and set a virtual directory there. The setting of a virtual directory is needed by several deployment schemes and can be achieved from Internet Information Manager Microsoft Management Consol (MMC snap-in). Because developers typically use the command line order 'XCOPY' to implement this technique, this technique is typically referred to as XCOPY Deployment.


Copy Web Site

Copy Web Site is a new technique provided in ASP.NET 2.0 and Microsoft Visual Studio 2005 (Available from the Website / Copy Web Site... Menu option). Although this technique is performed from inside Visual Studio (in contrast with the XCOPY deployment technique which is performed from outside Visual Studio), there is no compilation performed at all. All your pages are still in their source code form on the production server. Some developers see this fact as a high risk on their intellectual property. Two extra disadvantages of this technique (and in fact any other technique that does not involve any compilation before deployment) are reduced error checking and the slow initial page load.
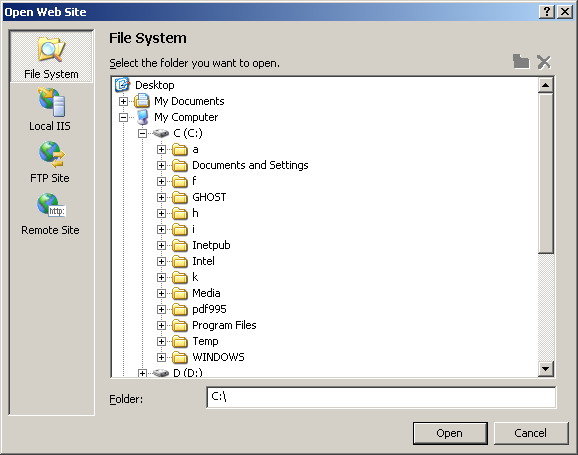
The reduced error checking is a direct result to that no compilation is performed and hence some errors may be discovered by your users later. The initial page load slowness is also because nothing is compiled yet and the entire web application has to be compiled at the time the first page is being requested. An advantage of this technique over the XCOPY deployment is that you have the options to deploy to the File System, the Local IIS, the FTP Sites, and the Remote Sites. Please see figure 1.

 
Figure 1

Pre-compilation

All of the deployment methods we mentioned so far suffer from the fact of that no compilation is performed along with the disadvantages that comes as a direct result from this fact. To ensure fast page load and some protection of your source code, you should pre-compile your web site before deployment.
Pre-compilation can be performed in-place by just adding '/Deployment/Precompile.axd' to the root URL of your web application and opening the resulting URL in Internet Explore.
Pre-compilation can also be achieved using the command line compiler 'aspnet_compiler'.
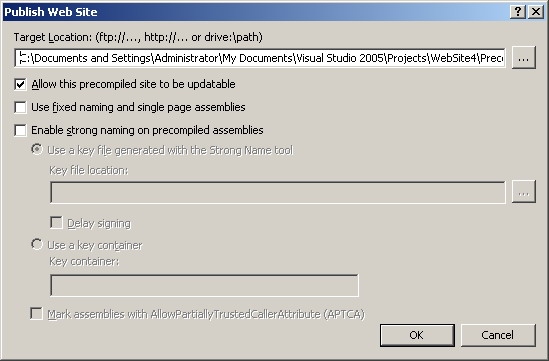
Using Microsoft Visual Studio 2005 you can still perform pre-compilation from the 'Build / Publish Web Site' menu command. Please see figure 2.


SETUP Projects 


It's always desirable to package your web applications such that they are easy to deploy on the production server. Microsoft Visual Studio 2005 gives you this rich packaging option for free ... Just follow the following instructions ...

First of all you need to know that our target is to create a package (and MSI file) that contain our web application in a form that can be later easily deployed on the final production server.
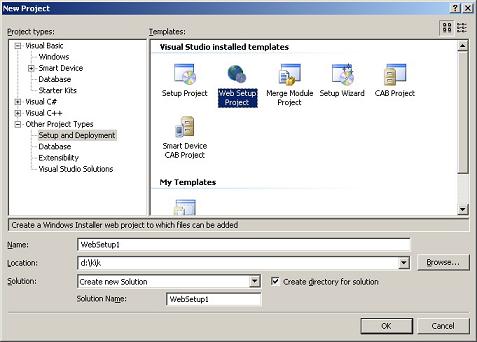
Let's start by selecting 'File / New / Project' in Microsoft Visual Studio 2005. This will present you the famous set of possible project types from which you will select 'Other Project Types / Setup and Deployment' then you will select the 'Web Setup  Project' icon from the side to the right. See figure 3.

Figure 3
In figure 3, set the appropriate project name and folder options then click OK.
You can always have the same behavior by adding the SETUP project above to your web application solution instead of creating a new separate solution. You can achieve this by selecting  'File / Add / New Project' instead of 'File / New / Project'. This way you will have a self contained web solution. The 'File / Add / New Project' method is much more recommended.
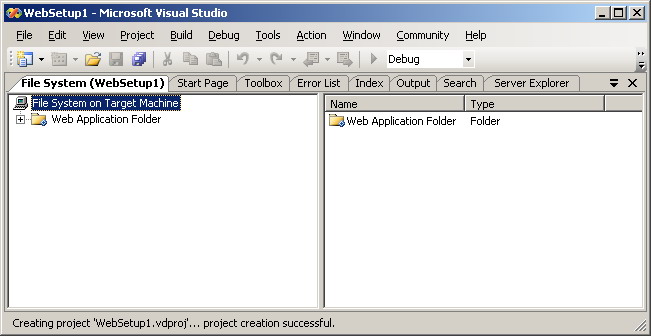
Your setup project will then open as in figure 4 below:

Figure 4
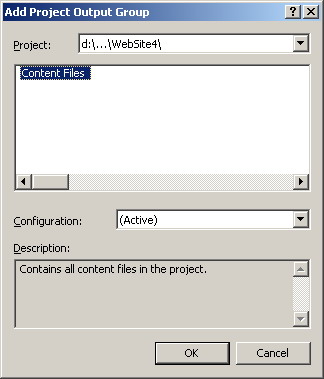
You will then need to add your web application files to the SETUP project we are developing now. This can be achieved by right clicking your SETUP project name in solution explorer and selecting 'Add / Project Output'. Please see figure 5.

Figure 5
To tune the properties of our SETUP project, we will need to press F4 while it's name is selected in the solution explore. This will bring the SETUP project's properties window. Several useful properties can be set in this window:
Property
Purpose
Author, Description, Manufacturer, ManufacturerUrl, ProductName, Subject, Title, and Version Use all of these properties to identify / describe your application and yourself.
AddRemoveProgramsIcon Here you can specify the icon to be displayed beside your application in Windows Control Panel's Add Remove Programs.
DetectNewerInstalledVersion Specify here whether or not a check is to be performed to determine the existence of a new version already installed of your web application.
RemovePreviousVersions Specify here whether you need an older version of your web application to be removed if a newer version is being installed.
RestartWWWService Some web applications requires the Internet Information Service to be stopped and then restarted after the deployment of the application. Use this property to control such behavior.
The last and most important step is to actually build our SETUP project. This cane be achieved by right clicking the name of our SETUP project in the solution explorer. It's this specific step that creates the MSI package / file mentioned above. This is the file you will need to distribute to your users and this is the file they will use to deploy the web application on their production server.
It's worth mentioning that the actual deployment process will be some what similar to the SETUP of any typical desktop application (with some exceptions of course). One of the many similarities is that the web application after deployment will automatically appear in the 'Add / Remove Programs' window of Windows Control Panel.

Production Server Deployment

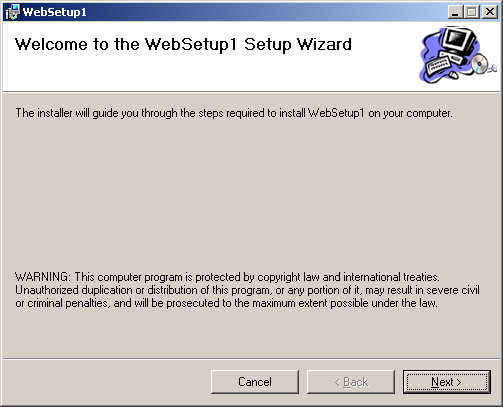
For your users to deploy your web application they will just need to double click the MSI file. This will produce something similar to figure 6:

Figure 6

Protection and obfuscation of .NET executable files (.exe, .dll,...)

You must know that every of your .NET products, web application or ASP.NET custom control, can be easily decompiled. Practically every user can get your source code by using some free .Net decompiler. If your license doesn't include source code it is not enough to just exclude source code files from installation. You need additional protection.
After long analyze, we decided to use Spices.Net for protection of all products of Bean Software. Even if you can't afford complete suite, consider at least their Obfuscator. Later, I discovered .NET Reactor which also looks good and it is about ten times cheaper :). You can check Product Comparison link on NetReactor site where it is compared to some other products, it looks really impressive, and not only in price issue.


Wednesday, December 7, 2011

RDLC Reports

<rsweb:ReportViewer ID="ReportingServicesReportViewer" runat="server" Height="100%"
            ProcessingMode="Local" ShowParameterPrompts="False" Width="100%">
        </rsweb:ReportViewer>


// create SqlConnection
        SqlConnection myConnection = new SqlConnection(ConnectionString);
        myCommand.Connection = myConnection;
        SqlDataAdapter da = new SqlDataAdapter(myCommand);

        //get the data
        DataSet data = new DataSet();
        da.Fill(data);

        if (data != null && data.Tables.Count > 0 && data.Tables[0].Rows.Count > 0)
        {
            ReportingServicesReportViewer.Visible = true;
            ltrStatus.Text = string.Empty;

            //provide local report information to viewer
            ReportingServicesReportViewer.LocalReport.ReportPath = Server.MapPath(Report.RDLCPath);

            //bind the report attributes and data to the reportviewer
            ReportDataSource rds = new ReportDataSource("DataSet1", data.Tables[0]);
            ReportingServicesReportViewer.LocalReport.DataSources.Clear();
            ReportingServicesReportViewer.LocalReport.DataSources.Add(rds);
            ReportingServicesReportViewer.LocalReport.Refresh();
        }
        else
        {
            ReportingServicesReportViewer.Visible = false;
            ltrStatus.Text = "No data to display.";
        }
 

Crystal report not running on deployment server


Server Error in '/' Application.


Could not load file or assembly 'CrystalDecisions.ReportAppServer.CommLayer, Version=10.2.3600.0, Culture=neutral, PublicKeyToken=692fbea5521e1304' or one of its dependencies. The system cannot find the file specified.


Solution For this : 

add all crystal report dll to the project bin folder and add reference of it..